
Snapshot/upload utility with GUI
May 9, 2008 at 3:37 PM by Dr. Drang
This post describes a short utility that streamlines my workflow in taking screenshots and uploading them to my server. It has a simple GUI and can create both a full-sized and reduced-sized image in a single step.
Longtime readers of this blog will note that I wrote a very similar utility a couple of years ago and decribed it in this post. In those days, I would invoke the script through Quicksilver, using QS’s Run… action to pass parameters—e.g., the file name—to the script. It worked well, but three things pushed me to write a new version:
- QS’s Run… action stopped working consistently. It would often disappear entirely from my iBook, leaving me no way to use the script.
- I switched from Quicksilver to LaunchBar, in large part because of QS’s quirks. (Here is more complete rundown of my reasons for switching.) But because Launchbar doesn’t allow parameters to be passed to scripts, the older script couldn’t be called from it.
- I wanted a graphical user interface so I didn’t have to remember the order of the options.
I call the new program snapftp, and I invoke it through FastScripts. I’ve given it a keyboard shortcut of Control-Option-Command-4, with is similar to the Apple-standard Command-Shift-4 for snapshots of a portion of the screen. The program launches and presents this dialog box.
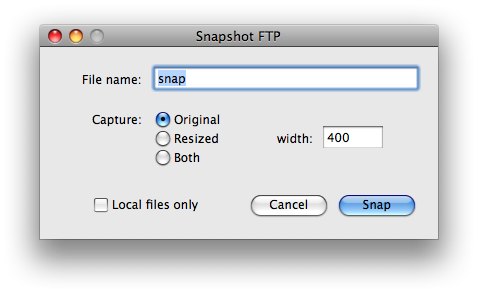
The filename for the snapshot is entered without the “.png” extension. Three types of snapshot are possible:
- A single capture file in the original size.
- A single capture file, resized according to the width parameter.
- Two capture files, one original and one resized.
By default, the capture files are saved to my Desktop and uploaded to the “images” directory on my server. The checkbox option at the bottom of the window can preclude the upload.
When I click on the Snap button (or press the Return key) the dialog box goes away, and the computer acts very much like it does when I press Command-Shift-4. The biggest difference is that whereas Command-Shift-4 starts in rectangle capture mode, snapftp starts in window capture mode. I prefer starting in window capture mode because I usually want a snapshot of a window. If I need to, I can change to rectangular capture mode by pressing the Space bar.
After the snapshot is made, the capture file appears on my Desktop and, unless told otherwise, is uploaded to my server via FTP. The URL of the uploaded file is put in the Clipboard for later pasting.
If the “Both” option was chosen, there are two capture files. The full-sized capture file has the name I gave it and the resized file has that name with a “-t” appended to it before the “.png” extension (the “t” is for “thumb” even though the resizing may produce an image much bigger than what is normally considered a thumbnail). For example, if I choose “snap” as the file name, “snap.png” will be the full-sized capture file and “snap-t.png” will be the resized capture file. Only the URL to the uploaded version of “snap.png” is put on the Clipboard.
There are several choices for adding a Mac-native graphical user interface to a script. The methods I considered are:
- The
display dialogcommand in AppleScript. The information available from this is limited to a line of text or a single button click, which is too little for snapftp. - CocoaDialog. This has more options than “display dialog” and easily called from any scripting language, but still collects only one piece of information from the user.
- Pashua. This has text input, radio buttons, checkboxes, popup menus, etc. and can collect several pieces of information from the user in one fell swoop. Its downside is that it requires an explicit textual description in the script to position the dialog elements.
- On My Command. Although the primary use of this utility is to create contextual menu items (which I have done), it can also create applications that make full use of nib files created by XTools’ Interface Builder.
- Platypus. Although this is supposed to provide a simple way to “Mac-ize” command-line scripts, it doesn’t seem to have any user interface hooks. Perhaps it’s meant only for dropping files onto an app.
Because it provided everything I needed for snapftp and didn’t force me to learn Interface Builder (which has always seemed exotic and scary to me), I chose Pashua. There was some trial and error involved in positioning the various parts of the GUI, but it wasn’t too painful.
Here’s the snapftp source code:
  1:  #!/usr/bin/python
  2:
  3:  import Pashua
  4:  import sys, os, shutil
  5:  from subprocess import *
  6:  from ftplib import *
  7:
  8:  # FTP and local parameters
  9:  host = "leancrew.com"
 10:  baseurl = "http://www.leancrew.com/all-this/images"
 11:  extension = ".png"
 12:  user = "drdrang"
 13:  passwd = "itzaseekret"
 14:  ftpdir = "public_html/all-this/images"
 15:  localdir = os.environ['HOME'] + "/Desktop"
 16:
 17:  # Dialog box configuration
 18:  conf = '''
 19:  # Window properties
 20:  *.title = Snapshot FTP
 21:
 22:  # File name text field properties
 23:  fn.type = textfield
 24:  fn.default = snap
 25:  fn.width = 264
 26:  fn.x = 94
 27:  fn.y = 130
 28:  fnl.type = text
 29:  fnl.default = File name:
 30:  fnl.x = 20
 31:  fnl.y = 132
 32:
 33:  # Radio button group properties
 34:  rb.type = radiobutton
 35:  rb.option = Original
 36:  rb.option = Resized
 37:  rb.option = Both
 38:  rb.default = Original
 39:  rb.x = 94
 40:  rb.y = 52
 41:  rbl.type = text
 42:  rbl.default = Capture:
 43:  rbl.x = 30
 44:  rbl.y = 92
 45:
 46:  # Resized width text field properties
 47:  rw.type = textfield
 48:  rw.default = 400
 49:  rw.height = 22
 50:  rw.width = 60
 51:  rw.x = 263
 52:  rw.y = 71
 53:  rwl.type = text
 54:  rwl.default = width:
 55:  rwl.width = 50
 56:  rwl.x = 215
 57:  rwl.y = 73
 58:
 59:  # Local files checkbox properties
 60:  lf.type = checkbox
 61:  lf.label = Local files only
 62:  lf.x = 32
 63:  lf.y = 5
 64:
 65:  # Default button
 66:  db.type = defaultbutton
 67:  db.label = Snap
 68:
 69:  # Cancel button
 70:  cb.type = cancelbutton
 71:  '''
 72:
 73:  # Open the dialog box and get the input.
 74:  dialog = Pashua.run(conf)
 75:  if dialog['cb'] == '1':
 76:    sys.exit()
 77:
 78:  # Go to the localdir.
 79:  os.chdir(localdir)
 80:
 81:  # Set the filenames and url.
 82:  fn =  '%s.png' % dialog['fn']
 83:  fnt = '%s-t.png' % dialog['fn']
 84:  url = '%s/%s' % (baseurl, fn)
 85:
 86:  # Capture a portion of the screen and save it to the file.
 87:  Popen(["screencapture", "-iW", fn], stdout=PIPE).communicate()
 88:
 89:  # Resize the file if asked to
 90:  if dialog['rb'] == 'Resized':
 91:    Popen(['sips', '--resampleWidth', dialog['rw'], fn],
 92:                      stdout=PIPE).communicate()
 93:  elif dialog['rb'] == 'Both':
 94:    shutil.copy(fn, fnt)
 95:    Popen(['sips', '--resampleWidth', dialog['rw'], fnt],
 96:                      stdout=PIPE).communicate()
 97:
 98:  # Upload the file unless told not to.
 99:  if dialog['lf'] != '1':
100:    ftp = FTP(host, user, passwd)
101:    ftp.cwd(ftpdir)
102:    ftp.storbinary("STOR %s" % fn, open(fn, "rb"))
103:    if dialog['rb'] == 'Both':
104:      ftp.storbinary("STOR %s" % fnt, open(fnt, "rb"))
105:    ftp.quit()
106:
107:    # Put the URL of the uploaded file onto the clipboard.
108:    Popen('pbcopy', stdin=PIPE).communicate('%s/%s' % (baseurl, fn))
My original snapshot utility was written in Perl, but I wrote snapftp in Python. Although Python is my current first choice for a scripting language, I would have stuck with Perl—there would have been much less rewriting—except that I found that Python is curiously faster at launching Pashua than Perl is when invoked from FastScripts. I started with a Perl program that just brought up the dialog box, thinking I would add the logic from the old program later. Although this Perl skeleton was fast on my Intel iMac, it took more than 10 seconds to launch Pashua and bring up the dialog box on my iBook G4, which was far too long. I then switched the skeleton program to Python and found that the dialog box came up almost instantly. I have no idea why.
Lines 9-15 provide the FTP and local parameters needed to ensure that the capture files end up where I want them. If you want your own version of snapftp, you’ll have to change these lines.
Lines 18-71 contain the Pashua configuration for the dialog box. One oddity of Pashua is that it wants the element positions given by their left and bottom coordinates rather than left and top. I got goofy looking results until that sunk in.
After getting the information from the user and putting it into the dialog dictionary (Lines 74-76), snapftp starts the built-in screencapture command-line program. The i option puts it in interactive mode, and the W option starts the interaction in window capture mode. As I said earlier, the user can switch to rectangular capture mode by pressing the Space bar.
If the user asked for a resized version of the capture, Lines 90-96 do the resizing with the built-in sips command-line program. The resampleWidth option sets the width of the resized image but keeps the aspect ratio constant. I’ve set this up to resize on the basis of width because I want to make sure the images fit within the content (white) area of the blog, which is sized according the the reader’s default font size. The default width of 400 pixels should make the image fit even for visitors who use a small default font size.
The last section of the program, Lines 99-108, uploads the image(s) to my server via FTP and puts the URL on the Clipboard using the pbcopy command. Of course, this happens only if the “Local files only” checkbox remains unchecked.
Both sips and screencapture are invoked through Python’s relatively new subprocess module. It’s supposed to replace the popen module, which I had just gotten used to. I still prefer Perl’s backticks. And while I’m complaining (mildly), let me say that I also prefer Perl’s FTP library to Python’s. Perl’s way of handling calls to an outside service is to mimic as much as possible the syntax of the service; Python’s way is to make the call using a Pythonesque syntax. While I understand the Python choice, I think it’s an impediment when—as is usually the case—the programmer knows the syntax of the outside service and knows what he would do if he were using that service directly.
I have snapftp saved in my ~/Library/Scripts folder where FastScripts can get at it. The Pashua application is saved in /Applications, as expected, and the Pashua.py Python module is saved in /Library/Python/2.5/site-packages. The module has one line that I feel is unwarranted and that I have commented out. Down near the bottom of Pashua.py, is a loop that looks like this:
for Line in Result:
    print Line
    Parm, Value = Line.split('=')
    ResultDict[Parm] = Value.rstrip()
I think a print command in a library utility that is supposed to read lines is just plain wrong, so I’ve commented out the print Line.
Overall, I’ve found snapftp to be much nicer and easier to use than my old Quicksilver-based solution (even when it worked). The addition of the GUI has not made it slower, and it is, of course, easier to remember the options when they’re laid out in front of you. This may inspire me to add a GUI gloss to some of my other scripts.