Installing and using Photopage
Installation steps
To install Photopage, you must first install the supporting
program and libraries. Photopage is written in Python and makes use of the Python Imaging
Library (PIL) and a special set of bitmapped fonts.
 Double-click on
Python-2.3.4.exe to install Python. Accept all of the default
settings during the installation. You should now have a
C:\Python23 directory.
Double-click on
Python-2.3.4.exe to install Python. Accept all of the default
settings during the installation. You should now have a
C:\Python23 directory.
 Double-click on
PIL-1.1.4.win32-py2.3.exe to install the Python Imaging Library
(PIL). Accept all of the default settings during the installation.
You should now have a C:\Python23\Lib\site-packages\PIL
directory.
Double-click on
PIL-1.1.4.win32-py2.3.exe to install the Python Imaging Library
(PIL). Accept all of the default settings during the installation.
You should now have a C:\Python23\Lib\site-packages\PIL
directory.
 Copy the base_pil
directory into the C:\Python23\Lib\site-packages\PIL
directory.
Copy the base_pil
directory into the C:\Python23\Lib\site-packages\PIL
directory.
 Copy photopage.pyw to
some convenient place on your hard disk. You may want to make a
shortcut to it on the desktop or in the Start menu.
Copy photopage.pyw to
some convenient place on your hard disk. You may want to make a
shortcut to it on the desktop or in the Start menu.
Now's a good time to see how the installation went.
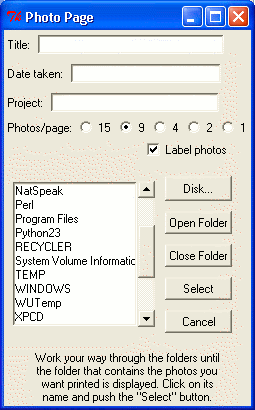
Double-click on the photopage icon. If the window below pops up,
you're in good shape. If not, we'll have to do a little
tweaking.
(Optional) By default, Photopage's initial directory is the
root directory of the C: drive. If you prefer that it start
somewhere else, open photopage.pyw in Notepad (or whatever editor
you like) and change line 29 from
currentdir = 'C:'
to
currentdir = 'C:/other/directory'
Use Unix-and-Internet-style forward slashes (/) instead of
DOS-style backslashes (\) to separate the directory names. If your
directory names include single quotes or apostrophes, you'll have
to change the enclosing quotes from single to double:
currentdir = "C:/mark's stuff/photos"
Using Photopage
Photopage is, I think, simple in concept and easy to use. It takes
all the "photo" files (JPG or TIF) in a folder and creates a
series of new JPG files with (typically) several photos per file,
labeled with the file name. These new JPGs can then be printed out and
put in an album. It's a lot like the Windows XP Photo Printing wizard
(which Photopage predates), except that it allows the pages to be
titled and the photos to be individually labeled.
At the top of the window are three text entry fields:
The Title field is what gets printed in bold at the top
center of the page. The program will complain if you leave it
empty, but if you really don't want a title you can fool it by
entering a space in the text box.
The Date taken field is what gets printed at the top right
of the page. As with the Title field, the program will complain if
you leave it empty, but you can fool it by using the same
trick.
The Project field is what gets printed at the top left of
the page. It can be left blank with no complaints from the
program.
The naming scheme for these fields is obviously derived from how
I use the program at work, but any text can be entered in any field.
Next comes a set of radio buttons that determine the size and
layout of the photos on the page. Fifteen per page results in a
"portrait" layout with five rows and three columns of photos. The
other choices make "landscape" layouts with as many rows as
columns.
The state of the "Label photos" checkbox determines whether the
filenames are printed below the photos, aligned with the right
edge.It's on by default.
If the folder of photo files also contains a text file named
"captions.txt," that file will be used to put additional descriptive
text under the photos, aligned with the right edge. Each line of the
"captions.txt" file should have the description of one of the
photos. The order of the descriptive lines is the alphabetical
order of the photo file names--this is the same order you get if
Windows Explorer is set to display the contents of the folder in
List View. A blank line in the file means no extra information will
be printed for that photo. The "captions.txt" file is ignored on
fifteen-per-page sheets because there isn't enough room to fit more
text under those photos.
The scrollbox of folder names and the set of buttons to its right
allow you to select the folder of photos. Clicking on the name of
a folder and then clicking on the Open button (or simply
double-clicking on the name) moves you inward through nested
folders; clicking on the Close button moves you outward. When you've
found the folder you want, click on it and then click on the Select
button--the program will then create the new JPGs in that same
folder and exit when it's done. Clicking the Cancel button (any time
before Select) will exit the program. Clicking the Disk
button pops up a menu that lets you move to another disk drive.
A few notes.
The names of the files created by Photopage are determined
by the number of photos per page:
| 15 | --> | Indexnn.jpg |
| 9 | --> | Ninenn.jpg |
| 4 | --> | Quadnn.jpg |
| 2 | --> | Pairnn.jpg |
| 1 | --> | Singlenn.jpg |
The nn part of the name is a two-digit page
number.
Photopage is smart enough to skip over its own files when
collecting the photo files from a folder. You can make both
4-per-page and 15-per-page sheets without fear that you'll end up
with tiny thumbnails of your 4-per-page files embedded in the
15-per-page files.
Because Photopage puts its files into the same folder as
the "source" files, you must be able to write to that folder.
A folder on CD will not work; you'll have to move the folder to
your hard disk.
Photopage is not "recursive." It will not look for photo
files in nested folders.
Debugging
Installation on Windows isn't always a cakewalk. To help figure
out what went wrong, take the following steps:
Make sure the Python executable is in your PATH.
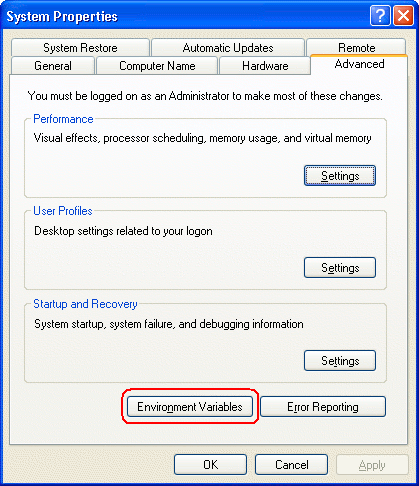 Open the System Control Panel, select
the Advanced tab along the top, and click on the Environment
Variables button near the bottom.
Open the System Control Panel, select
the Advanced tab along the top, and click on the Environment
Variables button near the bottom.
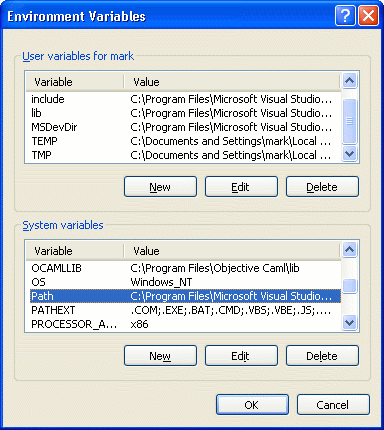 Find Path in the System
variables scroll box and double-click on it.
Find Path in the System
variables scroll box and double-click on it.
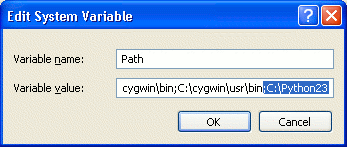 If C:\Python23 is somewhere in the string
of semicolon-separated directories, you don't need to do
anything. If it isn't, append a semicolon and C:\Python23 to
the end of the string.
If C:\Python23 is somewhere in the string
of semicolon-separated directories, you don't need to do
anything. If it isn't, append a semicolon and C:\Python23 to
the end of the string.
Click all the OK buttons needed to close the System
Control Panel.
Open a Command Prompt (DOS) shell and type
python. If you get something like the following:
Python 2.3.4 (#53, May 25 2004, 21:17:02) [MSC v.1200 32 bit (Intel)] on win32
Type "help", "copyright", "credits" or "license" for more information.
>>>
then Python is working (the >>> is
Python's prompt) and you can go on to the next test. If
not, then you either haven't installed Python, or your PATH
enviroment variable doesn't include the Python directory. Make
sure there's a C:\Python23 folder in your root
directory and that the PATH includes an entry for it.
Type import Image after the Python prompt. If
you get another prompt, then PIL is installed correctly. If you
get a response that starts with Traceback and ends
with No module named Image, then PIL hasn't been
installed correctly. Make sure there is a
C:\Python23\Lib\site-packages\PIL directory.
Type
open("C:/Python23/Lib/site-packages/PIL/base_pil/300/Arial_10_300.pil")
If you get a <open file 'C:/Python23/... >
message, then the fonts are installed correctly. If you get a
No such file or directory message, then the fonts
are not installed correctly. Make sure there is a
C:\Python23\Lib\site-packages\PIL\base_pil\300
directory and that there are several .pil files in
it that start with "Arial."
If you still can't get Photopage working, open a Command
Prompt shell in the directory where your copy of photopage.pyw
is. Type python photopage.pyw to start the program
and email me the error messages that show up in the Command
Prompt window along with a description of what you were doing
when the errors showed up.