Automatic W-9s with PDFpen
February 1, 2012 at 10:35 PM by Dr. Drang
I resisted PDFpen for a long time. I already had OmniGraffle, and while it certainly wasn’t convenient to fill out PDF forms in OmniGraffle, I could do it. This worked fine as long as filling out PDF forms was a rare task. But as the companies I work with began using PDFs more and more, the inefficiencies of using OmniGraffle began to grate on me.
The AppleScript automates the chore of filling out W-9 forms. This is the IRS form in which you certify that you’re not subject to backup withholding. Our clients don’t want to deduct backup withholding from their payments to us (and we certainly don’t want that, either), and having this form on file justifies their not doing so. I’m convinced it’s a waste of time and effort, but if it makes them happy I’ll fill out the damned form.
Actually, from today forward, I won’t be filling out the W-9s—AppleScript and PDFpenPro will. All I’ll be doing is running the AppleScript and emailing the filled-out form to the client. Here’s how I’ve set things up.
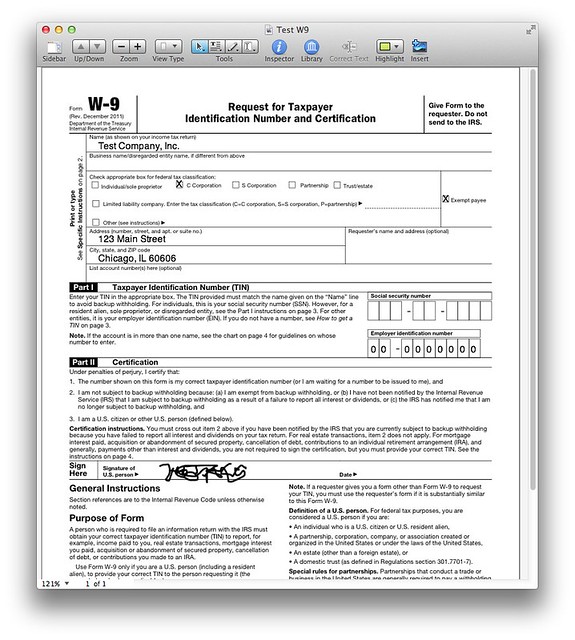
First, I downloaded a PDF of the form from the IRS and opened it in PDFpenPro.
This will be my base document, a template for all the customized W-9s I’ll be producing. I keep the template in my Dropbox folder so I can access it from either of my computers.
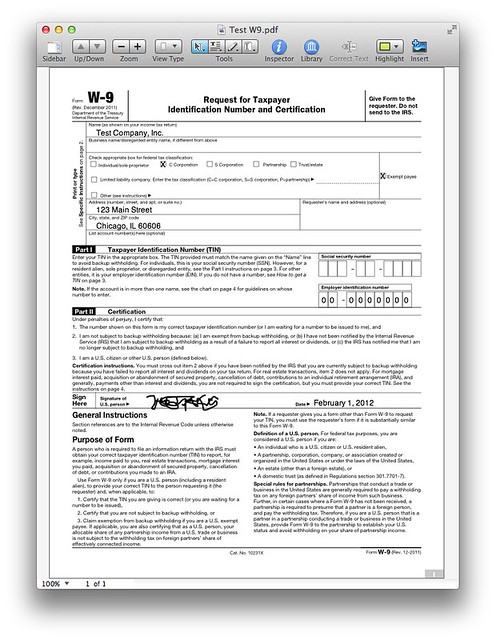
The only field that needs to be customized is the date next to my signature.
1 set today to current date
2 set dstamp to (month of today as text) & " " & (day of today as text) & ", " & (year of today as text)
3
4 tell application "Finder"
5 set w9 to document file "Test W9.pdf" of folder "Dropbox" of home as text
6 set neww9 to (desktop as text) & ":Test W9.pdf"
7 end tell
8
9 tell application "PDFpenPro"
10 open w9
11 set stamp to make new text imprint with properties {rich text:dstamp, x position:410, y position:262, width:144, height:16} at end of imprints of page 1 of document 1
12 set font of attribute run 1 of rich text of stamp to "Helvetica"
13 set size of attribute run 1 of rich text of stamp to 12
14 set color of attribute run 1 of rich text of stamp to {0, 0, 0}
15 close document 1 saving in neww9
16 quit
17 end tell
Lines 1 and 2 get the date in the format I want to insert into the form. Lines 4-7 get the paths to the template form (in Dropbox) and the currently non-existent filled-out form (which will be on my Desktop). If you want to use this script, you’ll probably want to change the file name, if not the folders, of these paths.
Update 2/2/12
Here’s a funny thing. On my MacBook Air, the colon before the file name in Line 6 is essential to separate the folder name from the file name. On my iMac, having that colon there causes the file to be saved in my home folder rather than on the Desktop. Apparently desktop as text returns a path without a trailing colon on the MacBook Air and with a trailing colon on the iMac. I have no idea why there’s a difference (they’re both running the same version of Lion), but if you try the script out and it doesn’t save the result where you want, this path discrepancy might be the explanation.
Line 10 then opens the template in PDFpenPro and the fun begins. Much of what follows was taken almost directly from one of the sample AppleScripts that comes with PDFpen.
Line 11 adds the date as a “text imprint”—that’s a PDFpen-specific term for text you add to a PDF—to the template at the proper coordinates. Lines 12-14 then set the formatting for the date to black 12-point Helvetica. Any of the values in these lines can be tweaked to suit your needs.
Lines 15 and 16 save the dated form to a new file on my Desktop and quit PDFpenPro.
I now have a one-step method for generating a W-9 to send to my client. No hunting for the template, no typing, no worries about overwriting the template. I just call the AppleScript via FastScripts and the filled-in form appears on my Desktop.
FastScripts isn’t necessary, of course. It’s just what I’m used to. You can use any one of the seemingly endless methods for calling a script.
An obvious extension to this script would be to add a section that creates a new mail message with some “Here is your W-9” boilerplate and the filled-in form attached. An exercise for a later date. There’s only so much AppleScript I can take in one day.
-
This is not OmniGraffle’s fault. It’s not meant to be a PDF manipulator, but it can be one in a pinch. I just got tired of being pinched. ↩
-
The Pro version is what I have, but as far as I know, everything I describe here can also be done with the basic version. ↩
-
I could fill out the requester’s name and address, too, but that’s not required, and my goal here is to do the bare minimum. ↩


