
Embedded Google maps
July 14, 2010 at 11:52 PM by Dr. Drang
I’m my company’s default webmaster, and I spent a few hours today learning how to embed Google maps into our web pages. I figured I’d write up an example before I forget.
There’s a whole family of Google Maps APIs, covering JavaScript, Flash, static images, Google Earth images, and more. The JavaScript API makes the most sense for my website. I read through the tutorial and started modifying its simple example while consulting the developer’s guide and sections of the reference.
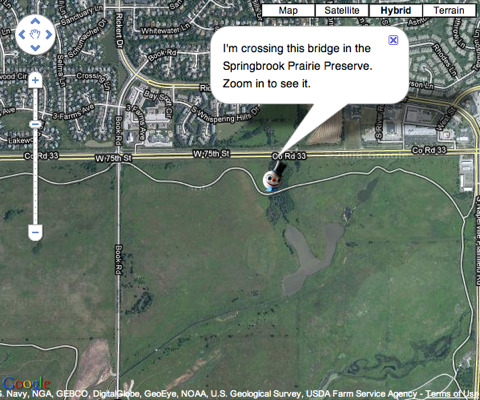
There are dozens of possibilities for creating an embedded map. I chose a fairly simple map with a custom marker and an info window. The result looks like this static image,
and is generated by this HTML/JavaScript/CSS melange:
 1:  <!DOCTYPE html PUBLIC "-//W3C//DTD XHTML 1.0 Strict//EN"
 2:     "http://www.w3.org/TR/xhtml1/DTD/xhtml1-strict.dtd">
 3:  <html>
 4:  <head>
 5:     <title>Embedded Google Map</title>
 6:     <meta http-equiv="Content-Type" content="text/html; charset=utf-8" />
 7:     <script type="text/javascript" src="http://maps.google.com/maps/api/js?sensor=false"></script>
 8:     <script type="text/javascript">
 9:      function initialize() {
10:        var drangLL = new google.maps.LatLng(41.74593, -88.17815);
11:        var centerLL = new google.maps.LatLng(41.743, -88.18);
12:              var myOptions = {
13:          zoom: 15,
14:          center: centerLL,
15:          scrollwheel: false,
16:          mapTypeId: google.maps.MapTypeId.HYBRID
17:        };
18:
19:        var map = new google.maps.Map(document.getElementById("map_canvas"), myOptions);
20:
21:        var contentString = '<span style="font-family: Helvetica, Arial;font-size: 80%">I\'m crossing this bridge in the<br />Springbrook Prairie Preserve.<br />Zoom in to see it.</span>';
22:        var infoWindow = new google.maps.InfoWindow({
23:          content: contentString });
24:
25:        var marker = new google.maps.Marker({
26:          position: drangLL,
27:          map: map,
28:          icon: "http://www.leancrew.com/all-this/images2010/littledrang.png",
29:          title:"What am I doing?"});
30:
31:        google.maps.event.addListener(marker, 'click', function(){infoWindow.open(map, marker);});
32:      }
33:
34:     </script>
35:     <style type="text/css">
36:       #map_canvas {
37:         height: 500px;
38:         width: 600px;
39:         display: block;
40:         margin-left: auto;
41:         margin-right: auto;
42:       }
43:     </style>
44:  </head>
45:  <body onload="initialize()">
46:    <p id="map_canvas"></p>
47:  </body>
48:  </html>
Line 7 imports the API, and Lines 8-31 use its methods to generate the map.
A variable for the position (latitude and longitude) of the marker is defined in Line 10, and one for the position of the initial center of the map is defined in Line 11. The options for the map itself, defined in Lines 12-17, set the initial zoom, center, and map type. I also decided to disable zooming with the scrollwheel, one of Google’s stupider ideas and a behavior that drives me crazy. It’s called a scrollwheel because it’s for scrolling. Google Maps is the only place I’ve seen a scrollwheel used for zooming.
The map is created in Line 19 using the options defined earlier. It’s placed in the item with ID map_canvas, which is the paragraph in Line 46.
The info window and its contents are defined in Lines 21 and 22. Pretty much self-explanatory, I think.
The custom marker is defined and added to the map in Lines 25-29. By default, the bottom center of the image is placed at the given position; this can be changed if there’s another point on your image that you want to be the “hot spot.” I didn’t bother.
Line 31 associates the info window with the marker and caused it to appear when the marker is clicked.
Lines 35-43 set up some simple CSS properties for the map.
Finally, the map code is invoked via the onLoad handler in the <body> tag on Line 45.
The result is a map with my head on the bike path in the Springbrook Prairie Preserve. You can do all the panning and zooming you’re used to in Google Maps. Clicking on my head pops up the info window.
The coding was pretty simple; the most time-consuming part was getting the latitude and longitude of the marker just right. If you zoom all the way in, you’ll see that my head is on a bridge over a small creek. To get it centered on the bridge I had to define the latitude and longitude in drangLL to 5 decimal points.