
Not a review of MarsEdit 3
May 5, 2010 at 5:06 PM by Dr. Drang
I’d like to thank Daniel Jalkut for releasing MarsEdit 3 this week. I don’t use MarsEdit and don’t plan to, but the hoopla and acclaim for the new version gave me the kick in the pants I needed to work up an addition to TextMate’s Blogging bundle.
MarsEdit is supposed to handle previews very well, which happens to be the only thing I don’t like about the Blogging bundle. Let’s say I’m writing my post (in Markdown, of course), and I want to see it before publishing. I hit ⌃⌥⌘P and get a preview that:
- doesn’t handle tables;
- doesn’t handle footnotes;
- doesn’t format equations; and
- uses a small sans-serif font for the body text.
In other words, it’s not really a preview.
I thought about making some changes to the standard Preview command, but it relies on a series of scripts that call one another, some of which are also used for other purposes. I was afraid that touching any one of them could screw up other commands. So I decided to start fresh.
The steps are simple:
Separate the header from the body of the post. The header is a series of lines like this
Blog: And now it's all this
Title: Not a review of MarsEdit 3
Category: blogging
Category: mac
Category: programming
Keywords: mac, blogging, programming, python, marsedit
at the top of the file. It’s followed by a blank line and then the rest is the body.
- Extract the title from the header.
- Convert the body from Markdown to an HTML fragment.
- Wrap the fragment in more HTML, turning it into a complete page that references CSS and JavaScript files that give the page the look of my blog.
I do the conversion in Step 3 using a customized version of MultiMarkdown that works with jsMath to generate nice-looking equations from LaTeX source. It’s similar to my customized PHP Markdown Extra.
The JavaScript files are local versions of jsMath, my line numbering script, and my slightly-edited version of Lukas Mathis’s popup footnote script. The CSS file is an ever-so-slightly altered version of the CSS file I use for this blog (MultiMarkdown and PHP Markdown Extra use different classes for their footnotes). The script that actually does the four-step process is written in Python. All of this is available for download from a GitHub repository, although I can’t imagine anyone using it without some serious editing.
The TextMate command I use to preview my posts is this addition to the Blogging Bundle, called Good Preview:
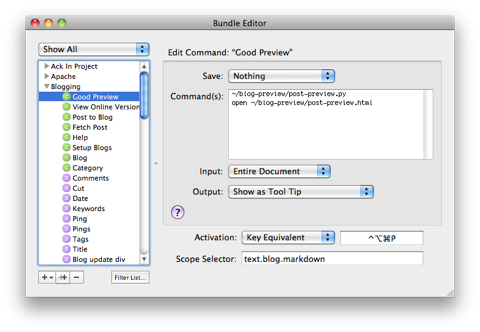
The two lines of code are
~/blog-preview/post-preview.py
open ~/blog-preview/post-preview.html
The first line runs the post-preview.py script, creating or overwriting the post-preview.html file on my Desktop. The second line opens post-preview.html in my default browser. In addition to writing a file, post-preview.py writes “Done” to standard output, which Good Preview shows as a tooltip when the command finishes successfully. The Good Preview TextMate command is not included in the repository, which is why I’ve reproduced it here.
I deleted the original Preview command from the Blogging bundle and removed the ⌃⌥⌘P Key Equivalent from the Preview commands in the Markdown bundle. It might have been smarter to use a different key combination for Good Preview and preserve ⌃⌥⌘P for the standard behavior. Oh well.
As you can see, the preview matches the look of my blog quite well. I left the sidebar in place, but empty.
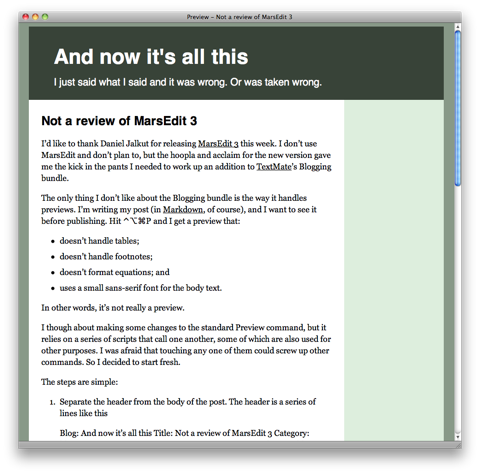
This is everything I want in a preview, and I don’t have to leave TextMate to get it. Thanks for the inspiration, Daniel!
Update 5/6/10
Acting on pupa_2’s comment below, I’ve moved the HTML preview file from the Desktop to the blog-preview directory where all the scripts live. This keeps my Desktop cleaner, and there’s no problem with continually overwriting the preview file.
I’ve changed the Good Preview screenshot and its two lines of code shown above accordingly.