
SSH tunneling scripts
December 14, 2008 at 10:36 PM by Dr. Drang
This post from early this year, keeps getting hits from Google searchers looking for information on how to set up screen sharing on their Macs. A small part of the post discusses SSH tunneling, a way of sending normally unencrypted data—like HTTP—through the secure SSH protocol. I use SSH tunneling periodically to connect from my iBook to my iMac at work, and I’ve recently written a few new scripts to make it easier for me.
Before I get into the scripts, you must know that SSH tunneling is possible only if the SSH port (normally port 21) on the computer you want to connect to can be reached by the computer you want to connect from. This may mean that the first computer has a publicly-addressable IP number; it may mean that the first computer is on a local network that uses NAT behind a router that forwards the SSH port to it1. I don’t want to get into the details of the network setup in this post—I just want to talk about the scripts.
My main script for SSH tunneling is called worktunnel, a simple shell script:
1:  #!/bin/bash
2:
3:  if [ $1 = '-h' ]; then
4:    echo Usage: worktunnel localport remoteport
5:  else
6:    ssh -L $1:127.0.0.1:$2 -N 100.100.100.100
7:  fi
There was a simpler version of worktunnel in the screen sharing post; this version reminds me how to use it when I ask it for help via worktunnel -h. It takes data acting through port remoteport on my work computer, pipes it through an encrypted tunnel to my local computer, where it’s made available on port localport. Sharp-eyed readers will suspect that the IP number at the end of Line 6, 100.100.100.100, is fake. You’re correct. In the worktunnel script sitting on my iBook, that number is replaced by the IP number of my work computer. If you want your own version of worktunnel, you should replace that number with the publicly-addressable IP number of the computer you want to connect to.
Because the Keychain on my iBook knows the passphrase for SSH access to my work computer, the ssh invocation on Line 6 does not prompt me to enter the passphrase every time I use worktunnel. If you’re using ssh for the first time, you will be prompted.
I have three main uses for SSH tunneling to my work computer: sharing its screen, accessing its web server, and sharing its iTunes library. Each of these applications uses a different set of port numbers. To avoid having to memorize the port number combinations, I’ve written three simple shell scripts that have the port numbers baked in.
First, before activating screen sharing on my iBook, I run workscreen:
1:  #!/bin/bash
2:
3:  echo "Now start screensharing with a local port of 6900."
4:  echo "Kill this process when you're done."
5:  worktunnel 6900 5900
When I run this from the Terminal, it reminds me how to proceed and gives me remote access to the screen on my work computer. The details are given in my screen sharing post.
When I want access to the webserver on my work computer, I run workweb:
1:  #!/bin/bash
2:
3:  echo "The remote webserver is available on port 8080."
4:  echo "Kill this process when you're done."
5:  worktunnel 8080 80
Now the webserver at work, which is not normally accessible to the outside world, is available to me at the URL 127.0.0.1:8080.
Finally, I share my work computer’s iTunes library with my iBook by running worktunes:
1:  #!/bin/bash
2:
3:  echo "Now start Network Beacon with a local port of 36890."
4:  echo "Kill this process when you're done."
5:  worktunnel 36890 3689
Port 3689 is the Digital Audio Access Protocol (DAAP) port used by iTunes when its set up for sharing its library. Running worktunes gets that port mapped to 36890 on my iBook. To make the shared library appear in iTunes on the iBook. I then run Network Beacon, a free proxy server for the Mac from Chaotic Software. Here’s how the DAAP proxy is configured in Network Beacon:
![]()
The Service Name can be anything you like, but the other entries must be as shown. With the tunnel established and the proxy server running, the iTunes sidebar on my iBook will show the proxy in the Shared area.
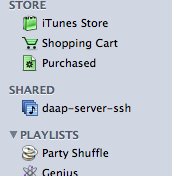
Clicking on the proxy in the sidebar will start transferring the library information across the connection.

When the library information transfer is complete (which takes about 30 seconds when I’m at home; library size and network connection speed determine how long it takes) the tracks on my work computer appear in the browser and all my playlists appear in the Shared section of the sidebar. Time to start listening!
Obviously, none of these scripts is necessary. I could start a tunnel using the ssh command directly. But by collecting my common uses into scripts with names that are easy to remember—as long as I can remember “work,” tab completion will remind me of the rest of the name—I don’t have to keep all these port numbers in my head. Letting the machine do the dull work is what computing is all about.
-
The screen sharing post gives a brief description of how to set up forwarding on your router. ↩