
Annotating photos with OmniGraffle
October 2, 2008 at 4:26 PM by Dr. Drang
The reports I write for work usually include photographs. Most of the photos are straightforward and need nothing more than a simple caption to explain. But some are of unusual items or are taken at unusual angles or magnifications; these are best served by annotations directly on the photo. Almost any graphics application can be used to add text and arrows to a photo, but OmniGraffle has become my favorite. It’s toolset makes the trial and error process of annotation very smooth.
OmniGraffle’s main purpose is to create diagrams—organization charts, flow charts, family trees, that sort of thing. It’s the Visio of the Macintosh world. What makes it different from other Mac drawing programs is how it keeps track of the structure of a drawing. Items that are connected by a line or an arrow stay connected as you move one or the other around. And it’s that feature that makes is so good for marking up a photo.
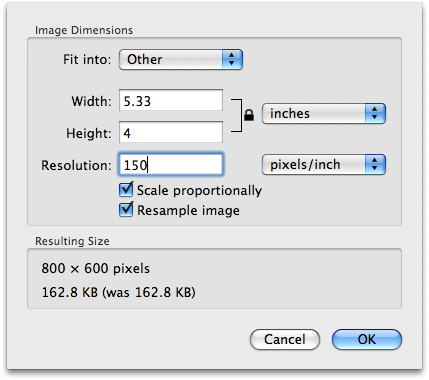
Start by creating a new, blank OmniGraffle document for importing the photo. Since OmniGraffle is a vector graphics program and photos are bitmapped images, there’s something of a mismatch between the two when it comes to sizes. OmniGraffle uses the Resolution setting in the JPEG to figure out big it should make the photo. For example, an 800x600 photo with a 150 dpi (dots per inch) resolution will be imported as a 5⅓″ by 4″ object in OmniGraffle.
To get a photo that fits nicely on a one-page OmniGraffle document, open the photo in Preview first, and use the Adjust Size command from the Tools menu to change the Resolution. If you change the units of Width and Height to inches, you’ll see immediately what size the photo will be in OmniGraffle. I like to adjust the Resolution to get the photo’s long dimension in the 5″ to 6″ range. Make note of the Resolution; you’ll need it when the time comes to export the annotated photo.
You may think that changing the resolution in Preview is an unnecessary step. After all, you can just grab one of the corner handles on the imported photo and resize it directly in OmniGraffle. That’s true, and if you plan to export the annotated photo as a PDF, resizing it directly in OmniGraffle is fine. But if you want to export it as a JPEG, TIFF, or PNG, you’ll need to know the resolution to get the best quality output. The only way I know to be sure of the resolution is to set it before you import the photo.
Once you’ve saved your photo with the new Resolution setting, you can import it into OmniGraffle either by using the Place Image command from the File menu or by simply dragging the photo from the Finder into OmniGraffle. Select the photo and lock it so you can add text to the document over the photo without attaching the text to the photo object itself. Now it’s time to start annotating.
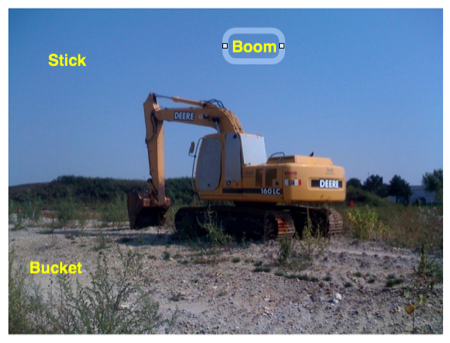
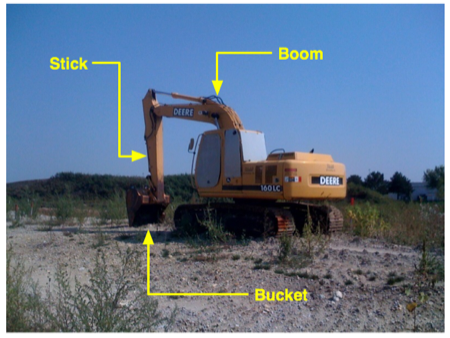
I like to start by creating text objects with all the words I’m going to use. Helvetica Bold is my usual font and a 14-point size works well for 5″–6″ photos. I fiddle with the text colors to get decent contrast with the background colors. Here’s an example using a photo from my Flickr stream:
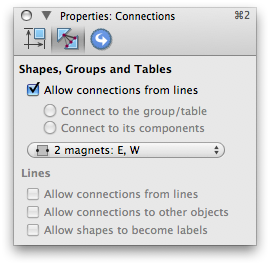
Now I select all the text objects and give them magnets on their left and right—or east and west, as OmniGraffle would have it—sides. This is done through the Connections tab of the Properties Inspector. Now the ends of the arrows I attach to these text objects will stay attached.
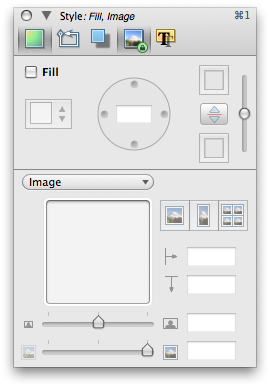
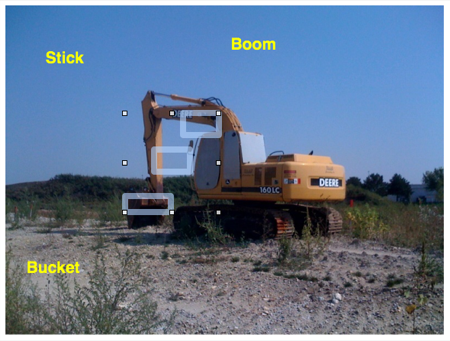
The next step is to create invisible rectangles to place over all the things I want to point to. I start out creating visible rectangles, then uncheck the Stroke, Fill, and Shadow properties in the Style Inspector.
Now that I have the invisible rectangles, I set the magnets on them according to how I want the lines to attach. North and south magnets on the objects that will have the lines coming in from the top or the bottom; east and west magnets on the objects that will have the lines coming in from the sides.
Now it’s time to draw the lines from the text objects to the invisible rectangles. Change the color and thickness of the lines to suit your purposes. Add arrowheads to the ends if that helps.
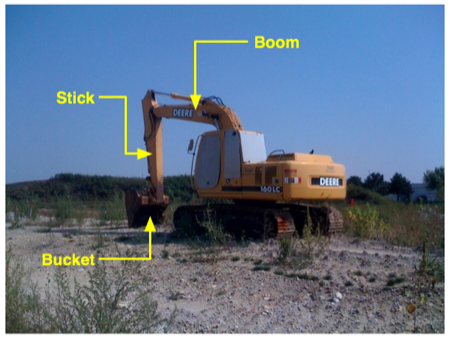
It’s at this point that OmniGraffle’s understanding of structure makes things nice. If you decide to move the text or the other end of the leader line, you just grab the object and drag it where you think it will look better. The lines will readjust on their own. For someone like me, who can’t stop fiddling with the layout, this saves a tremendous amount of time.
Also very helpful are OmniGraffle’s auto-arrangement features. When you need all your annotation text to be lined up and equally spaced, OmniGraffle pops up little hints that let you snap things into place as you drag them around. Very neat.
I’m not suggesting you go out and buy OmniGraffle just for annotating photos. But if you happen to have a copy, this is a use you might not have thought of.