
My no-server personal wiki—Part 2
June 25, 2008 at 5:19 PM by Dr. Drang
In my last post, I gave my reasons for needing a wiki for project notes, what I wanted it to do, and why I decided to roll my own instead of going with any of the readily available free or commercial offerings. In this post, I’ll describe how my system works. If some of the choices I’ve made seem odd to you, the earlier post should explain the whys and wherefores.
The files for the wiki—both the content and the build files—sit in a folder called “notes.” This makes the system portable. I keep a skeleton version of this folder on my Desktop, and whenever I need a notes wiki for a new project, I drag a copy from the Desktop into the project folder. Here’s a view of the skeleton.
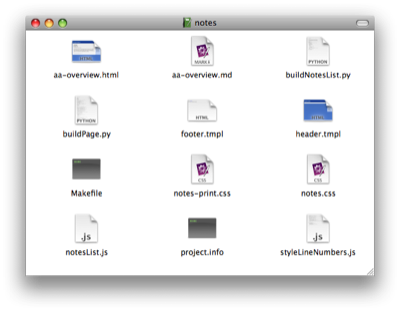
The content is kept in the Markdown-formatted files with an .md extension. The skeleton provides just one of these, aa-overview.md, which is filled with mostly nonsense. Any file added to the folder with an .md extension will be taken as the content for a new page. The wiki pages themselves are the .html files with the same basenames as the .md files. Everything else in the folder is either a programming, template, or configuration file.
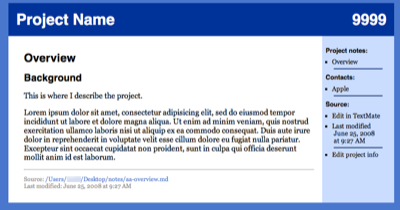
The HTML version of aa-overview is intended to be the home page of the wiki. For the skeleton file, it looks like this:
The skeleton aa-overview.md, as with all the Markdown files, contains just the content of the main section of the page:
# Overview #

## Background ##

This is where I describe the project.

Lorem ipsum dolor sit amet, consectetur adipisicing elit, sed do eiusmod tempor incididunt ut labore et dolore magna aliqua. Ut enim ad minim veniam, quis nostrud exercitation ullamco laboris nisi ut aliquip ex ea commodo consequat. Duis aute irure dolor in reprehenderit in voluptate velit esse cillum dolore eu fugiat nulla pariatur. Excepteur sint occaecat cupidatat non proident, sunt in culpa qui officia deserunt mollit anim id est laborum.
The header, the sidebar, and the footer are all built from the template and configuration files. The page is built statically, so aa-overview.html is a full HTML file, not a fragment.
The top section of the sidebar contains links to all the notes files in the folder. The links are created automatically by the build script, which looks through the folder for all the .md files. These links will be in the sidebar of every page, so I can go directly from any page in the wiki to any other. This would make for a very cluttered sidebar if my projects had hundreds of notes pages, but I’ve never needed more than a dozen or so.
Each page’s name is taken from top line of its .md file. The page links are sorted according to the file name, which is why the overview page is given the “aa-” prefix—I want it at the top of the list. I use this method of sorting to group similar pages in the list of links; inspection notes have an “ii-” prefix, lab notes have an “ll-” prefix, etc.
The project name and number in the header and the contact link in the sidebar come from the project.info file:
projname = Project Name
projnumber = 9999
contact = Apple:A1A2AA41-FA30-40AE-9925-FD6DB270B0A5%3AABPerson
This file defines variables that are used by the build script to create the pages. The projname and projnumber are obvious; the contact variable contains the name of the contact (“Apple” for the skeleton file) and its Address Book ID, separated by a colon. I described a script for extracting the ID earlier this month—this is where I use it. When you click on a contact link in the sidebar, the Address Book opens to the card for that entry.

This is convenient when I’m reviewing a project and want call or email my client.
Although the skeleton version of the project.info file has just one contact, a page can have any number of contact links. I just add more contact = lines to the file.
I can, of course, edit a page by going to the Finder, working my way to the appropriate notes folder, and opening the .md file in my text editor. But I’ve made it easier than that. The editor I use, TextMate, is the handler for special URLs of the form
txmt://open?url=file:///Users/drang/Desktop/notes/aa-overview.md
By including a link like that in the sidebar, I can just click on it and TextMate will open the .md file associated with the page. The bottom of the sidebar has a similar link to the project.info file.
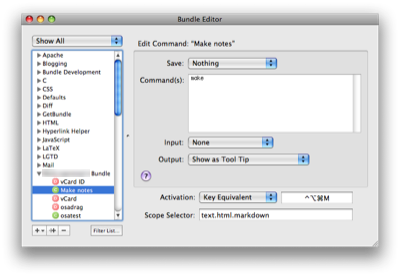
I mentioned before that the HTML files in the notes folder are built statically, which means that, unlike a regular wiki, I have to do something to get them built. And what I need to do is run the make utility on the Makefile in the notes directory. This could be done through the Terminal, but I’ve made a simple TextMate command that runs make whenever I type Command-Option-Control-M.
There’s probably a clever way to use Folder Actions to run the Makefile whenever an .md file is added or changed, but I haven’t looked into that yet.
In summary, when I want to create a new wiki for project notes, I
- Drag the skeleton
notesfolder from my Desktop to the project folder. - Edit the
project.infoandaa-overview.mdfiles to include the appropriate information. - Add new
.mdfiles as my work on the project grows.
In my next post in this series, I’ll describe the template files and build scripts and will provide a zipfile with my skeleton notes folder.
Update
Part 3 is now up.