
Digital photos and me, Part V
October 20, 2006 at 12:14 AM by Dr. Drang
In this fifth and—I think—last post in the series, I’m going to describe the program I use to prepare sheets of photos for printing at my local Costco. You could use the same procedure for printing at, say, Wal-Mart or any of the various online photo printing shops.
It’s not really necessary for you to read the first four posts in the series (one, two, three, and four), but since the program uses the RMagick library for Ruby, reading the fourth post would probably be a good idea if you’re using a Macintosh, as it explains a fairly simple way to get RMagick installed. The program I’ll describe isn’t Mac-specific, so if you can get RMagick installed on your Windows or Linux machine, it should work fine. (The should in that last sentence is the tipoff that I haven’t tested it on Windows or Linux. If you do, let me know how it works.)
The idea behind the program is to create a JPEG file that:
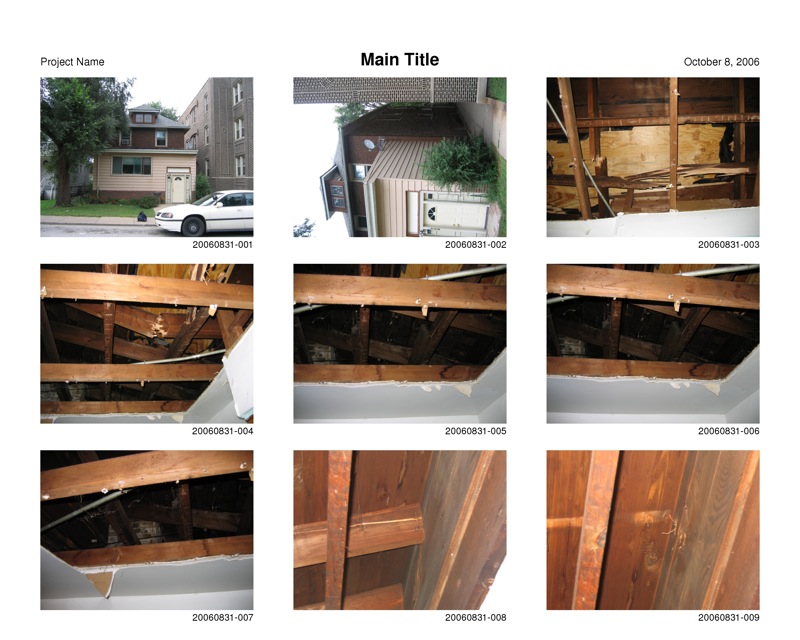
- contains several photographs, each labeled with its file name;
- has an optional title and a pair of subtitles;
- it formatted to print out nicely on an 8×10, with room for binding or punched holes along one of the long edges.
An example would be something like this, which you can click on to see a larger version.
Back in 2000, I wrote a similar program in Python. I used it first to organize family photos, but then adapted it to handle the digital photos I was taking at work. I chose Python because of Tkinter, Python’s built-in interface to the Tk library of user interface widgets. I wanted the program to have a GUI that worked in Windows so my wife and coworkers could use it. The program worked pretty well, and I wrote a post about it some time ago. But I began to dislike it because:
- it was written with an 8½×11 sheet in mind, and when I switched from inkjet printing my own sheets on 8½×11 paper to sending the files off to Costco for photographic printing on 8×10 paper, the difference in aspect ratio changed the placement of the images and messed up the binding margin;
- it used the Python Imaging Library (PIL) and a set of high-resolution bitmap font files, and I wanted the flexibility to change fonts and the resolution of the output file;
- I’d rather just use a command-line program; and
- my fling with Python was over, and I didn’t want to be maintaining a Python program anymore.
The result is the following Ruby program. I’m not really a Ruby programmer—not yet, anyway—and it shows. The program is very much a procedural program, not object-oriented in any way, so I’m sure it would be considered poor Ruby style. No matter. For now, the important thing is that it works; the logic and data contained in it can be rewritten into a more Rubyish form as I learn the language and its styles and idioms.
I call the program photosheets because that’s what it makes. Here’s the listing.
#!/usr/bin/env ruby

require 'optparse'
require 'RMagick'
include Magick

Geometry = {
  4 => {
    'name' => 'Quad',
    'rows' => 2,
    'cols' => 2,
    'image_size' => [1280, 960],
    'dpi' => 300,
    'height' => 2400,
    'width' => 3000,
    'left_margin' => 145,
    'right_margin' => 2855,
    'top_margin' => 180,
    'title_size' => 16*4,
    'subtitle_size' => 10*4,
    'title_clearance' => 45,
    'label_size' => 9*4,
    'label_clearance' => 4,
    'horizontal_clearance' => 150,
    'vertical_clearance' => 100,
    'bfont' => 'Helvetica-Bold',
    'font' => 'Helvetica'
  },
  9 => {
    'name' => 'Nine',
    'rows' => 3,
    'cols' => 3,
    'image_size' => [800, 600],
    'dpi' => 300,
    'height' => 2400,
    'width' => 3000,
    'left_margin' => 150,
    'right_margin' => 2850,
    'top_margin' => 180,
    'title_size' => 16*4,
    'subtitle_size' => 10*4,
    'title_clearance' => 45,
    'label_size' => 9*4,
    'label_clearance' => 4,
    'horizontal_clearance' => 150,
    'vertical_clearance' => 100,
    'bfont' => 'Helvetica-Bold',
    'font' => 'Helvetica'
  }
}

def place_photo(photo, pos, per_page, lo)
  pos = (pos - 1) % per_page
  $img.read(photo)

  # Strip out the photo's directory path and extension.
  base = File::basename(photo, ".*")

  # Rotate if necesary and scale
  if  ($img.rows > $img.columns)
    $img.rotate!(270)
  end
  scale_x = lo['image_size'][0]*1.0/$img.columns
  scale_y = lo['image_size'][1]*1.0/$img.rows
  scale = [scale_x, scale_y].min
  h = (scale*$img.columns).round
  v = (scale*$img.rows).round
  $img.resize!(h,v, HammingFilter)

  # Determine placement on page.
  row = pos/lo['cols']            # zero-indexed
  col = pos - row*lo['cols']      # zero-indexed
  x = lo['left_margin'] +
          col * (lo['image_size'][0] + lo['horizontal_clearance']) +
          lo['image_size'][0] - h

  y = lo['top_margin'] + lo['title_size'] + lo['title_clearance'] +
          row * (lo['image_size'][1] + lo['vertical_clearance']) +
          lo['image_size'][1] - v

  lx = x + h
  ly = y + v + lo['label_clearance'] + lo['label_size']

  # Place the photo.
  # $sheet.composite!($thumb, x, y, OverCompositeOp)
  $sheet.composite!($img, x, y, OverCompositeOp)

  # Place the label.
  label = Draw.new
  label.font(lo['font'])
  label.pointsize(lo['label_size'])
  label.text_align(RightAlign)
  label.text(lx, ly, base)
  label.draw($sheet)

  $img.clear
  STDERR.print "#{pos+1}..." if $verbose
end

def make_sheet(sheet_count, photo_list, per_page, lo)
  # Determine the range of photos for this sheet.
  first_photo = (sheet_count - 1) * per_page
  last_photo = first_photo + per_page - 1
  if (last_photo >= photo_list.size)
    last_photo = photo_list.size - 1
  end
  sublist = photo_list[first_photo..last_photo]

  # Initialize the sheet.
  # sheet = Image.new(lo['width'], lo['height'])
  $sheet.erase!
  # $sheet = $sheet.texture_floodfill(100,100, $granite)

  # Draw the title block.
  tx = lo['width']/2
  ty = lo['top_margin'] + lo['title_size']
  title = Draw.new
  title.font(lo['bfont'])
  title.pointsize(lo['title_size'])
  title.text_align(CenterAlign)
  title.text(tx, ty, $ctitle) unless $ctitle == ''
  title.pointsize(lo['subtitle_size'])
  title.font(lo['font'])
  title.font_weight(NormalWeight)
  tx = lo['left_margin']
  title.text_align(LeftAlign)
  title.text(tx, ty, $ltitle) unless $ltitle == ''
  tx = lo['right_margin']
  title.text_align(RightAlign)
  title.text(tx, ty, $rtitle) unless $rtitle == ''
  title.draw($sheet)

  # Place the photos.
  pos = 0
  sublist.each do |photo|
    pos += 1
    place_photo(photo, pos, per_page, lo)
  end

  # Save the sheet.
  name = "Sheet-%02d.jpg" % sheet_count
  $sheet.write(name)
  STDERR.puts "#{name} done!" if $verbose
end


# Start of main program.

# Defaults.
per_page = 9
$ctitle = ''
$ltitle = ''
$rtitle = ''
$verbose = FALSE

# Process the options.
opts = OptionParser.new
opts.banner = "Usage: photosheets [options] files"
opts.separator("Create one or more 8x10 sheets of photos.\nOptions:")
opts.on("-n N", Integer, "photos per page (4 or 9; default: 9)") {
  |num| per_page = num }
opts.on("-t TITLE", String, "main title (centered)") {
  |str| $ctitle = str }
opts.on("-l SUBTITLE", String, "left subtitle (project)") {
  |str| $ltitle = str }
opts.on("-r SUBTITLE", String, "right subtitle (date)") {
  |str| $rtitle = str }
opts.on("-v", "verbose output (default: off)") {
  |str| $verbose = TRUE }
opts.on("-h", "--help", "print this message") {
  |str| puts opts.help; exit }
photo_list = opts.parse(ARGV)   #everything after the options

photo_list = photo_list.delete_if { |f| f =~ /^Sheet-/ }

layout = Geometry[per_page]

# Get the title and subtitles interactively if no main title is given.
if ($ctitle == '')
  STDERR.print "Main title:              "
  $ctitle = STDIN.gets
  STDERR.print "Left subtitle (project): "
  $ltitle = STDIN.gets
  STDERR.print "Right subtitle (date):   "
  $rtitle = STDIN.gets
end

# Initialize the counts and the images.
num_photos = photo_list.size;
num_sheets = num_photos/per_page
num_sheets =num_sheets + 1 if (num_photos % per_page > 0)
$granite = Magick::Image.read('granite:').first
# $granite = $granite.level(0, 1.50)
$sheet = Image.new(layout['width'], layout['height'])#{
#   self.background_color = '#DDD'
#  }
$img = ImageList.new

# Make the sheets.
1.upto(num_sheets) do |i|
  make_sheet(i, photo_list, per_page, layout)
end
As you can see, it’s about 200 lines long, with the first 50 or so lines taken up with defining the geometry of the layout.
Thanks to the optparse library, you can get a good idea of how the program works by typing photosheets --help at the command line. The response will be
Usage: photosheets [options] files
Create one or more 8x10 sheets of photos.

Options:
    -n N                             photos per page (4 or 9; default: 9)
    -t TITLE                         main title (centered)
    -l SUBTITLE                      left subtitle (project)
    -r SUBTITLE                      right subtitle (date)
    -v                               verbose output (default: off)
    -h, --help                       print this message
which tells you that you can use the -n option to specify either 4 or 9 photos per sheet and you can give the main title with the -t option and the two subtitles with the -l and -r options. Since at work I usually use the left subtitle for the project name and the right subtitle for the date or date range of the photos, those conventions are mentioned parenthetically in the help. Nine photos per sheet is the default because that’s what I use the most. You can change any of this stuff by fiddling with the parts of the program labeled # Defaults and # Process the options.
The program creates a series of JPEG files in the directory you are in when you call it. The files are named Sheet-01.jpg, Sheet-02.jpg`, etc. If you already have files with those names in the current directory, they’ll be overwritten (a ruthlessness that is a legacy of my Linux days).
Normally, the program doesn’t give any feedback as it runs—you just wait until the output files are created. But if you call the program with the -v option, it will give you a running account of its progress, like this
1...2...3...4...5...6...7...8...9...Sheet-01.jpg done!
1...2...3...4...5...6...7...8...9...Sheet-02.jpg done!
1...2...3...4...5...6...7...8...9...Sheet-03.jpg done!
1...2...3...4...5...6...7...8...9...Sheet-04.jpg done!
1...2...3...Sheet-05.jpg done!
An important feature not mentioned in the help is interactive input. If you call the program without the -t option, it assumes you want to provide the title and subtitles interactively and begins prompting you for them. Here’s an example of the prompts and the answers I gave to produce the sheet shown above.
Main title:              Main Title
Left subtitle (project): Project Name
Right subtitle (date):   October 8, 2006
This behavior is set up to make my life easier and require the least amount of typing and thinking. My most common use of the program is to open the Terminal, change to a directory of photos, and call photosheets *.jpg. I then type in the titles (any of which can be blank) when prompted and wait for the multi-photo sheets to be created. These get uploaded to Costco and printed on 8×10 paper.
If you’re wondering why I bother printing out my photos when I can just view them on my computer, you need to get more experience with that big analog thing we older folks call the “real world.” Riffling through sheets of photos, or laying them all out on a big table, is much more efficient than looking at just a few at a time on your screen. No matter how big your screen is, I’ll be able to find a table that’s bigger.
So that’s it. These five posts, taken together, explain how I deal with digital photos on screen and off. No iPhoto necessary, and in fact, no iPhoto wanted because iPhoto’s method of organizing photos isn’t convenient for the way I work. Perhaps I should say “iPhoto’s old method of organizing photos,” as this way of working was developed when iPhoto ’05 was the current thing. I’ve read somewhere that the current iPhoto doesn’t force you to organize your photos its way. If that’s the case, I might be willing to revisit it. But right now I don’t feel any compelling need to.