
Oh, snap!
April 11, 2006 at 11:06 AM by Dr. Drang
The window snapshots in my last post were a little ragged for two reasons:
I’m not very accurate controlling the arrow cursor with a trackpad; and
my knowlege of Mac system software is way out-of-date.
From time immemorial—or at least since 1985 when I got my first Mac—you could make a copy of the entire Mac screen by pressing Command-Shift-3. In those days, you could then open the screenshot in MacPaint, select the part of the screen you want to show (typically a single window, which was rectangular), copy it, and paste it into MacWrite. Third-party freeware and shareware allowed you to do fancier screenshots: only the top window, with a delay (good for taking snapshots of menus), etc. I’m not sure when Command-Shift-4 was added to the system to allow direct rectangular selection from the screen, but somehow it got stuck in my brain and—like Command-Shift-3—stayed there during my eight-year sojourn in Linux.
So when I came back to the Mac about a year ago, I knew two ways of making snapshots, and the snapshots I made for the blog were done with Command-Shift-4. And because I’m no good at controlling the crosshairs with my iBook’s trackpad, and I don’t want to spend a lot of time cleaning up, the window snapshots in the blog typically included a few pixels of background around the edges.
After the last posting, in which the snapshots were particularly inaccurate, I decided to search around for a way to capture just the top window. Thinking this would lead me to some bit of freeware, I was surprised to find that the top Google hit on “mac screenshot window” was this article at O’Reilly by David Battino, which showed me the magical Command-Shift-4-space combination. Hit Command-Shift-4 as usual, and then hit the spacebar. The cursor turns from crosshairs to a camera and now a click of the mouse button takes a snapshot of whatever desktop object (window or icon) the camera is over. To help you see what is going to be snapped, that object dims.
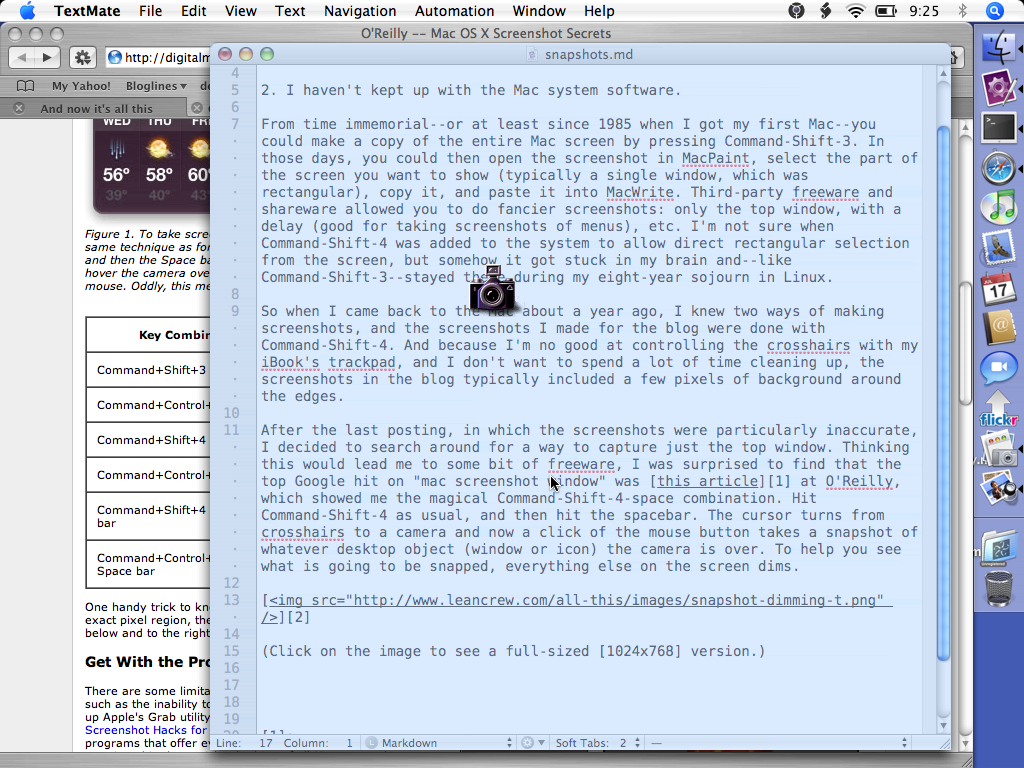
(Click on the image to see a full-sized [1024x768] version.)
Command-Shift-4 is built-in, but the O’Reilly article also talks about third-party snapshot utilities. I’m currently trying out SnapNDrag, which
- is free;
- will snap windows, a rectangular selection (using crosshairs that extend the full height and width of the screen), or the entire screen;
- can be set to snap after a preset time;
- will scale the image; and
- will save the image with whatever filename you want and let you drag it to whatever folder you want.
I find the last two features very useful, as I like to have a scaled-down snapshot within the blog that links to the full-sized version, and it’s much easier to remember what a snapshot is if you can name it as you take it.
The article also mentions the commercial product, Snapz Pro X, which, in addition to snapshots, will also make movies of the screen. Snapz was used to make some, if not all, of the TextMate screencasts. I used it during my free trial period to make the screenshot above.
While writing this post, I noticed the mention of ImageWell in the comments to the O’Reilly article. Apparently, it will upload snapshots via FTP, which would cut another step out of the process I use for posts like this. I’ll give it a try.
Update
The FTP upload feature of ImageWell is quite nice, but since the program won’t capture windows (only full screens or rectangular selections), I won’t be using it. I’m going to look into setting up a folder action to automatically FTP files. That should work smoothly with SnapNDrag.
Update 2
Later thoughts and conclusions on screenshots are here.